Tuesday, May 31, 2011

Mike's First Hobie AI Sail


 This weekend I took my family for a Memorial Day sail. Mike sailed the AI for the first time and this was Ruth's first time on the Tandem Island. There were plenty of power boats to deal with. A relatively short sail but very much under control.


I carried both boats on the trailer. The extra boat makes setup slightly more complicated requiring full assembly of the Adventure Island.

Monday, May 30, 2011

My Hobie Trailer

 I have had some question about my Hobie Trailer. I bought the trailer several years ago at Harbour Freight to carry several conventional kayaks.  Originally I decked over the frame, and added framework to carry three kayaks. When I bought the TI the boat was much longer so I had to move the forward post as far forward as it would go.

 To make the main bunk I used things around my garage. I bolted angle iron frame to the top of the trailed deck. Two 2x4 PT board are laid on each side, slightly angled down. Polyethylene Lattice is screwed into to the wood with a slight dip in the middle. The with of the bunk is based on the with of the Lattice, 2 Foot.

 The two forward posts are bow supports from the original design. I can carry my new AI on top of the TI by mounting a rear support frame. This supports the AI without putting any load on the TI. Below picture shows the two boats loaded.

Thursday, May 19, 2011

Crossing the Chesapeake with Rene Potvin Video 1


This is the video of my crossing of the Chesapeake with Rene Potvin. This part is my part of the trip from Lynnhaven Bay to Willoughby to meet up with Rene and then the crossing to the Eastern Shore, Virginia Passage that runs up the east coast of the Delmarva peninsula. Notice the current running out of the bay toward the end of the video. Next I need to produce part 2, returning back to the Lynnhaven where I get hit by a thunderstorm...

Wednesday, May 18, 2011

Crossing the Chesapeake with Rene Potvin


Rene Potvin is on a personal challenge sailing a Hobie Adventure Island from Miami to Montreal. I have been following his travels on his Web Site: miami2montreal

This weekend he arrived at Willoughby Marina in Norfolk, Virginia. I took this opportunity to meet with him. Landing in the Navy part of town, I took him to a Willoughby landmark, The Thirsty Camel for dinner. This is a true sailor bar with a old guy band and much too friendly waitress. The more beer that you drink, the better the band sounds and the better the waitress looks...
We made plans to meet up in the morning and cross the Chesapeake together.

I had to sail first sail the 13 miles from Lynnhaven to Willoughby. The wind was ideal 15-20 from the South. The crossing was smooth broad reach until we got to the other side when the wind shifted to the east.


Rene will not be going through the Chesapeake Bay. There is too much private, military and industrial development. The Chesapeake-Delaware canal dumps you high up the Delaware so you have to go south to round Cape May. He will be using the road less traveled up the east coast of the DelMarVa Peninsula. I escorted him to the start of that waterway.


He carries a lot of gear so his boat sits lower and runs slower. I had to reef and zigzag to stay broad side of him. The standard Hobie seat is replaced with a Wal-Mart fishing seat so that he does not have to deal with sitting in the water that constantly splashes up into the cockpit.


On my way back to Lynnhaven I was hit by a thunderstorm with 40 knots including hail and total whiteout. For about a half a hour it was survival weather with the sail rolled down to 1 foot trying to ride out the storm. I know now why there are handles on each side of the cockpit: Some place to bury your fingernails into, while trying to hold on. Total trip for me was 46 miles. Not a bad performance for the second time on the water in this new Hobie Adventure Island....


I have much more Video that I have taken during this trip that I will eventually be posting once i have time to produce it...

Friday, May 13, 2011

New Hobie 2011 Adventure Island

 
I sold my Newport 16 sailboat so that I could buy a Hobie Adventure Island. Today I picked up my new boat from my local dealer. It is a 2011 model with the old twist & stow rudder.

I started assembling the boat as soon as I got home . There are many things that I really like on this AI compared to the TI that I have been sailing for the past 7 months.  Even though the hull is smaller the distance from the bow to the front aka is longer. The rear storage is also much longer. It was dark by the time I had the boat assembled.

I noticed that some of the plastic trimming was not as clean as I would expect. The rear storage scupper holes have some plastic overlap making it hard to fit the scupper plug. The rudder steering line holes were undercut and look like a source for water leaks.

 On my TI I had problems with my screw-in fittings. The TI plugs could not be fully screwed in because of the remaining tap shavings in the holes. Some of the AI holes have shavings, but not as bad as the TI.

But the thing that I noticed the most is that Hobie has changed how they tap the threads in the plastic cups. The threads are NOT FULLY FORMED !!! Most only have 2-3 partially cut threads. As a engineer I have concerns with that. I am not sure that if enough pull is applied the fitting will pull out.


I did not inspect the inside of the hull until I had the boat assembled. When I opened the center hatch something caught my eye.  Next to the centerboard trunk there is a imperfection that looks like it has been sanded down. I had to disassemble the boat so that I could inspect the bottom.

 You can not see it from this picture but there is a slight dimple on the outside just aft and inboard of the centerboard trunk.

Another thing that I noticed while inspecting the bottom is that the hull has a slight bump right where the mast support is. Are the support turnbuckles too tight???


The AI is a beautiful boat. I can not wait to get her on the water.

But it is these few small items that I need to verify if they are OK or if I need to do something about...

Installing Kayaking Bob Spray Skirt on Hobie TI

To keep the spray down I installed a mesh spray skirt on each side of the bow. I purchased it from Kayaking Bob. The spray skirt comes without any installation accessories. The web site has different recommendation on how this can be installed. I decided to use what I had in my garage instead of going out and purchasing additional material.

List of Materials:
     Parachute Cord
     4 Plastic Eyes
     4 Plastic Hooks
     2 Fiberglass rods from a reflective road marker
     Heatshrink Tubing

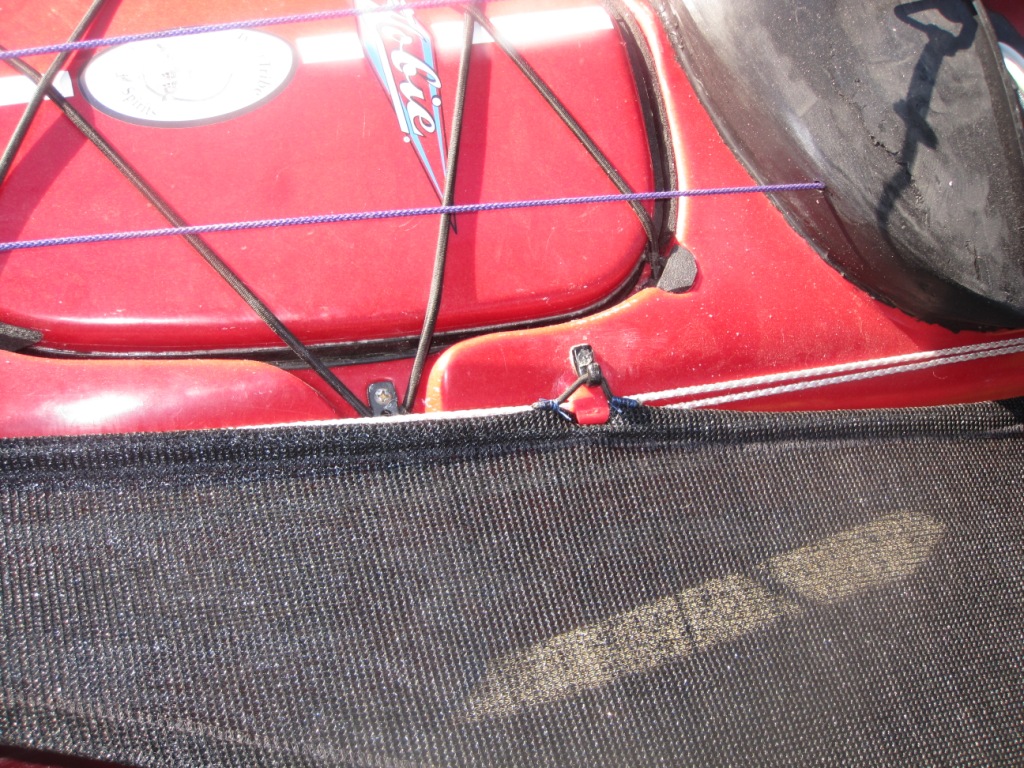
I threaded the sprayskirt with the parachute cord leaving ~ 4" loop at each corner. ~ 2" Heatshrink was slid over one end and then both ends were tied with a square knot. The Heatshrink was slid over the knot and shrunk to keep the knot from coming apart. The knot was slid into the AFT short section of the skirt to hide the knot.

Two plastic eyes were screwed on to the bow. The bow loop of the skit was passed through the eye (inside-out) and the entire skirt was passed through the loop. The position of the skirt was adjusted and parachute cord was sewn to the skirt to maintain the distance. 

 The AFT corner is attached with a combination of hook and loop. Make sure the center loop position is slightly forward of the ama crossarm. The tension keeps the loop from coming out.

 The center corner is pulled out using a piece of parachute cord. Make a small loop in the end. Loop it through the center. Run the line out to the bungee peg, back to the start loop and make a sliding knot on the return string. This will allow the tension to be adjusted as the lines streches. The double wrap acts like a Spanish Tacle reducing the load on the sliding knot.

 The inside edge tends to pull away from the hull. To keep it close a fiberglass rod is inserted into the inside edge of the skirt. I did not want to use use the hatch bungee as recommended on some sites to pull in the skirt. A short Bungee and a plastic hook is used. I have a welded hook but another reverse plastic hook could be used. The two hooks pull against each other.

To stowe the spray skirt disconnect the center loop. Roll skirt into it self and tuck under the hatch bungee.

I will be going on to the bay this weekend to test the rig.